目录
简介
本系列是windows系统下、采用ArkTS语言、ArkUI框架、deveco studio编译器学习纯鸿蒙软件研发,采用API version 9进行。本小节主要了解一个ArkTS项目的项目结构,以及如何创建一个ArkTS项目进行一些相关的操作。纯小白,一步步学习,记录一下过程便于查询。
1.ArkTS项目结构
按照上一节鸿蒙软件开发1-1 从零入门到hello world-CSDN博客我们已经创建了hello world工程,接下来根据创建的工程了解ArkTS项目结构。
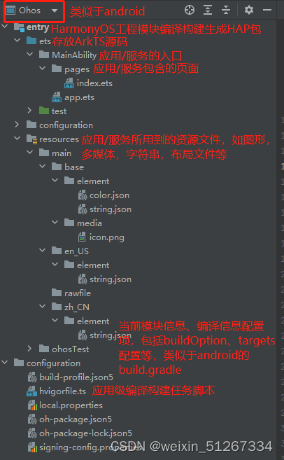
可以联想一下android相关的结构,能更好的理解每个结构的作用。
2.构建ArkTS项目
之前的工程创建完成后,运行后是hello world界面,接下来我们了解下项目入口在哪里,如何构建一个界面,界面构建逻辑,界面间的跳转等。
2.1 构建界面
2.1.1工程界面解析
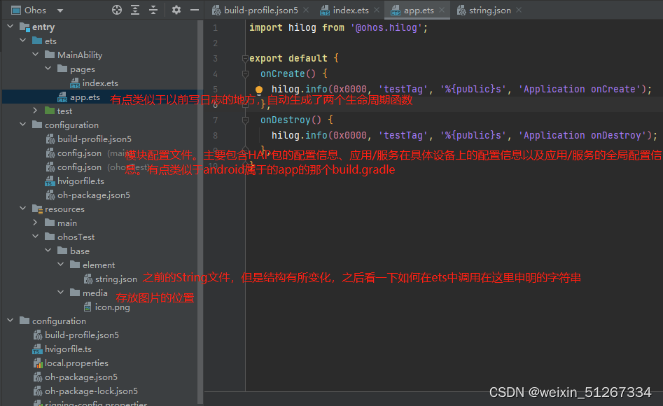
工程同步完成后,在"Project"窗口,切换到"Ohos"窗口,项目结构如上所示,打开"entry > src > main > ets > pages ",下方有一个"index.ets"文件,该文件即为我们的第一个界面,是创建工程时自动生成的,同时该文件也是我们项目的入口。
// index.ets
@Entry
@Component
struct Index {    ------>类似于以前的Class加上文件名
  @State message: string = 'Hello World'-------》目前看是声明变量的方式,
下方对其进行了调用,申明形式为@State 变量名:变量类型=变量值(不一定对,如果不对之后修改)

  build() {------>固有格式?
    Row() {------>行:布局方式
      Column() {---->列:布局方式
        Text(this.message)------->Text组件,类似于TextView,调用了上方申明的变量message
          .fontSize(50)---->Text的样式设置字体大小
          .fontWeight(FontWeight.Bold)------>Text的样式设置,字体加粗
      }
      .width('100%')------>Column的宽度设置,高度不设置就类似于android的wrap_content
    }
    .height('100%')------>Row的宽度设置,宽度不设置就类似于android的wrap_content
  }
}
按照对该界面的解析,此处界面布局有点类似于采用Row代表行,Column代表列,以类似于画表格的逻辑进行布局,此处的组件和布局的样式都直接混写,不知道后续是否会如JS和CSS一样分开,还是如android布局和Activity分开。
2.1.2构建新界面
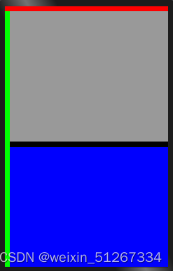
到这里可以根据这种方式尝试自己去搭建一些界面框架了,打开项目结构列表,点击"entry > src > main > ets ",右键点击"pages "文件夹,选择"New > ArkTS File",命名为"main",点击"Finish",文章目录结构如下,搭建分块界面如下。
@Entry
@Component
struct Main {
  build() {
    Column() {
      Row(){
        //顶部条
      }.width('100%').height('50px').backgroundColor('#FF0000')
      //下方
      Row(){
        Column(){
          //左侧条
        }.width('50px').height('100%').backgroundColor('#00FF00')
        Column(){
          //上方布局
          Row(){}.width('100%').height('50%').backgroundColor('#999999')
          //下方布局
          Row(){
            Column(){
              //上方收缩条
              Row(){}.width('100%').height('50px').backgroundColor('#000000')
              //下方主体
              Row(){}.width('100%').height('100%').backgroundColor('#0000FF')
            }.width('100%').height('100%')
          }.width('100%').height('50%')
        }.width('100%').height('100%')
      }.width('100%').height('100%')
    }
    .height('100%')
  }
}
同时修改了index界面:
@Entry
@Component
struct Index {
  @State message: string = 'Hello World'
  build() {
    Row() {
      Column() {
        Text(this.message)
          .fontSize(50)
          .fontWeight(FontWeight.Bold)
        Button(){
          Text('Next').fontSize(30).fontWeight(FontWeight.Bold)
        }.type(ButtonType.Capsule).margin({top:20})
        .backgroundColor('#000000')
        .width('40%')
        .height('5%')
        Text(this.message).fontSize(50).fontWeight(FontWeight.Bold)
      }
      .width('50%')
      .backgroundColor('#FF0000')
      Column(){
        Text(this.message)
          .fontSize(50)
          .fontWeight(FontWeight.Bold)
        Button(){
          Text('Next').fontSize(30).fontWeight(FontWeight.Bold)
        }.type(ButtonType.Capsule).margin({top:20})
        .backgroundColor('#000000')
        .width('40%')
        .height('5%')
        Text(this.message).fontSize(50).fontWeight(FontWeight.Bold)
      }
      .width('50%')
      .backgroundColor('#00FF00')
    }
    .height('100%')
  }
}
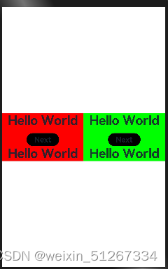
两个界面预览如下:
2.1.3界面配置
配置主要是界面路由的配置,打开"entry > configuration>config.json(main) ",在文件中的"js"标签下的"pages"标签下配置第二个页面的路由"pages/main"。示例如下: (此处有误:参考鸿蒙开发2-2 开发前的配置与准备-CSDN博客中的3路由跳转中的3路由跳转)
 "js": [
      {
        "mode": {
          "syntax": "ets",
          "type": "pageAbility"
        },
        "pages": [
          "pages/index",
          "pages/main"-------->添加了这,目前指南采用的貌似是API8,
                               和我的结构不同,不知道配置是否正确
        ],
        "name": ".MainAbility",
        "window": {
          "designWidth": 720,
          "autoDesignWidth": false
        }
      }
    ]
2.2 实现界面跳转
界面间跳转主要通过页面路由Router来实现,页面路由router根据页面url找到目标页面,从而实现跳转。
(1)使用页面路需要先导入Route模块:import router from '@ohos.router'。
(2)给按钮添加点击事件,使用.onClick函数。
(3)通过路由push跳转界面。(此处有误:参考鸿蒙开发2-2 开发前的配置与准备-CSDN博客中的3路由跳转)
按步骤可以实现两个界面之间的相互跳转,实现后代码如下:
index.ets:
import router from '@ohos.router';//引入route模块
@Entry
@Component
struct Index {
  @State message: string = 'Hello World'
  build() {
    Row() {
      Column() {
        Text(this.message)
          .fontSize(50)
          .fontWeight(FontWeight.Bold)
        Button(){
          Text('Next').fontSize(30).fontWeight(FontWeight.Bold)
        }.type(ButtonType.Capsule).margin({top:20})
        .backgroundColor('#000000')
        .width('40%')
        .height('5%')
        .onClick(()=>{//跳转事件
          router.push({url:'pages/main'});//跳转
        })
        Text(this.message).fontSize(50).fontWeight(FontWeight.Bold)
      }
      .width('50%')
      .backgroundColor('#FF0000')
      Column(){
        Text(this.message)
          .fontSize(50)
          .fontWeight(FontWeight.Bold)
        Button(){
          Text('Next').fontSize(30).fontWeight(FontWeight.Bold)
        }.type(ButtonType.Capsule).margin({top:20})
        .backgroundColor('#000000')
        .width('40%')
        .height('5%')
        Text(this.message).fontSize(50).fontWeight(FontWeight.Bold)
      }
      .width('50%')
      .backgroundColor('#00FF00')
    }
    .height('100%')
  }
}
main.ets:
import router from '@ohos.router';//引入route模块
@Entry
@Component
struct Main {
  build() {
    Column() {
      Row(){
        //顶部条
      }.width('100%').height('50px').backgroundColor('#FF0000')
      //下方
      Row(){
        Column(){
          //左侧条
        }.width('50px').height('100%').backgroundColor('#00FF00')
        Column(){
          //上方布局
          Row(){}.width('100%').height('50%').backgroundColor('#999999')
          //下方规划
          Row(){
            Column(){
              //上方收缩条
              Row(){}.width('100%').height('50px').backgroundColor('#000000')
              //下方界面
              Row(){
                Button(){
                  Text('BACK').fontSize(30).fontWeight(FontWeight.Bold)
                }.type(ButtonType.Capsule).margin({top:20})
                .backgroundColor('#000000')
                .width('40%')
                .height('5%')
                .onClick(()=>{//点击事件
                  router.push({url:'pages/index'});//跳转回原界面
                })
              }.width('100%').height('100%').backgroundColor('#0000FF')
            }.width('100%').height('100%')
          }.width('100%').height('50%')
        }.width('100%').height('100%')
      }.width('100%').height('100%')
    }
    .height('100%')
  }
}
实现效果:

本文来自极简博客,作者:青春无悔,转载请注明原文链接:鸿蒙了解ArkTS项目结构 实现ArkTS项目