简述
轮播图在应用中,已经很常见的展现方式。像uniapp、iview,viewUI等前端组件框架,都提供了轮播图组件。那么在harmonyOS中,如果要实现轮播,我们是使用swiper 组件
swiper组件
swiper 组件是一种容器组件。它提供切换子组件显示的能力。
属性
| 名称 | 类型 | 默认值 | 必填 | 说明 |
|---|---|---|---|---|
| index | number | 0 | 否 | 当前在容器中显示的子组件的索引值。 |
| autoplay | boolean | false | 否 | 子组件是否自动播放,自动播放状态下,导航点不可操作5+。 |
| interval | number | 3000 | 否 | 使用自动播放时播放的时间间隔,单位为ms。 |
| indicator | boolean | true | 否 | 是否启用导航点指示器,默认true。 |
| digital5+ | boolean | false | 否 | 是否启用数字导航点,默认为false。必须设置indicator时才能生效数字导航点。 |
| indicatordisabled5+ | boolean | false | 否 | 指示器是否禁止用户手势操作,设置为true时,指示器不会响应用户的点击拖拽。 |
| loop | boolean | true | 否 | 是否开启循环滑动。 |
| duration | number | - | 否 | 子组件切换的动画时长。 |
| vertical | boolean | false | 否 | 是否为纵向滑动,纵向滑动时采用纵向的指示器。 |
| cachedsize7+ | number | -1 | 否 | swiper延迟加载时item最少缓存数量。-1表示全部缓存。 |
| scrolleffect7+ | string | spring | 否 | 滑动效果。目前支持如下:- spring:弹性物理动效,滑动到边缘后可以根据初始速度或通过触摸事件继续滑动一段距离,松手后回弹。- fade:渐隐物理动效,滑动到边缘后展示一个波浪形的渐隐,根据速度和滑动距离的变化渐隐也会发送一定的变化- none:滑动到边缘后无效果。该属性仅在loop属性为false时生效。 |
事件
| 名称 | 参数 | 说明 |
|---|---|---|
| change | { index: currentIndex } | 当前显示的组件索引变化时触发该事件 |
| rotation | { value: rotationValue } | 智能穿戴表冠旋转事件触发时的回调。 |
代码实现
新建一个项目 ImgSwiper

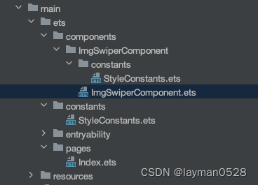
新建组件ImgSwiperComponent
在ets 文件夹下新建文件夹ImgSwiperComponent,然后新建ImgSwiperComponent.ets
import  {StyleConstants} from  './constants/StyleConstants'


@Component
export struct  ImgSwiperComponent{

  @Link imgList: Resource[];

  @Prop index:number;

  @Prop autoPlay:boolean;

  @Prop loop:boolean;

  @Prop indicator:boolean;


  build(){
      Swiper(){
        ForEach(this.imgList,(item)=>{
            Image(item)
              .width(StyleConstants.FULL_WIDTH)
              .height(StyleConstants.Swiper_HEIGHT)
        },(item)=>JSON.stringify(item))
      }
      .index(0)
      .autoPlay(true)
      .height(StyleConstants.Swiper_HEIGHT)
      .loop(true)
      .indicator(true)


  }

}

export class StyleConstants{

  static readonly FULL_WIDTH:string ="100%"

  static readonly Swiper_HEIGHT:string = "30%"
}
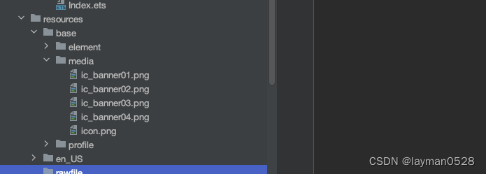
在资源文件中,引入临时文件
如果你还没有对接api ,只是静态页面,可以在资源文件中引入图片文件
在开发页面中使用ImgSwiperComponent组件
-
引入组件
import {ImgSwiperComponent} from '../components/ImgSwiperComponent/ImgSwiperComponent'
-
在页面初始化前初始化图片数据
aboutToAppear(){ this.imgList.push($r('app.media.ic_banner01')) this.imgList.push($r('app.media.ic_banner02'))
} -
完整代码
import {ImgSwiperComponent} from '../components/ImgSwiperComponent/ImgSwiperComponent'
@Entry @Component struct Index { @State message: string = 'Hello World' @State imgList: Resource[]=[];
aboutToAppear(){
  this.imgList.push($r('app.media.ic_banner01'))
  this.imgList.push($r('app.media.ic_banner02'))

}


build() {
  Flex(){
    ImgSwiperComponent({imgList:$imgList,autoPlay:true,index:0,loop:true,indicator:true})
  }


}
}
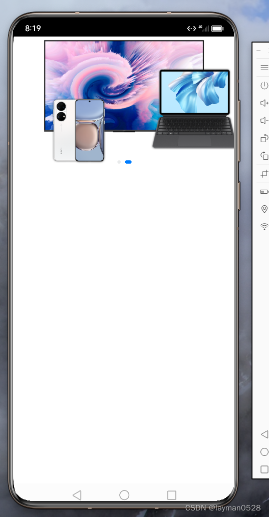
展示效果
本文来自极简博客,作者:冬日暖阳,转载请注明原文链接:HarmonyOS鸿蒙开发-简易轮播图